Week 1 - Postgres, Docker and Ingestion Scripts
What is PostgreSQL?
PostgreSQL often referred to as Postgres is an enterprise-class open source relational database. It supports both SQL and JSON(technically NoSQL) querying.
It's used for basically everything that a database can be used for from simple transactions, to analytics to geospatial data.
Here's a very good TLDR:
What is Docker?
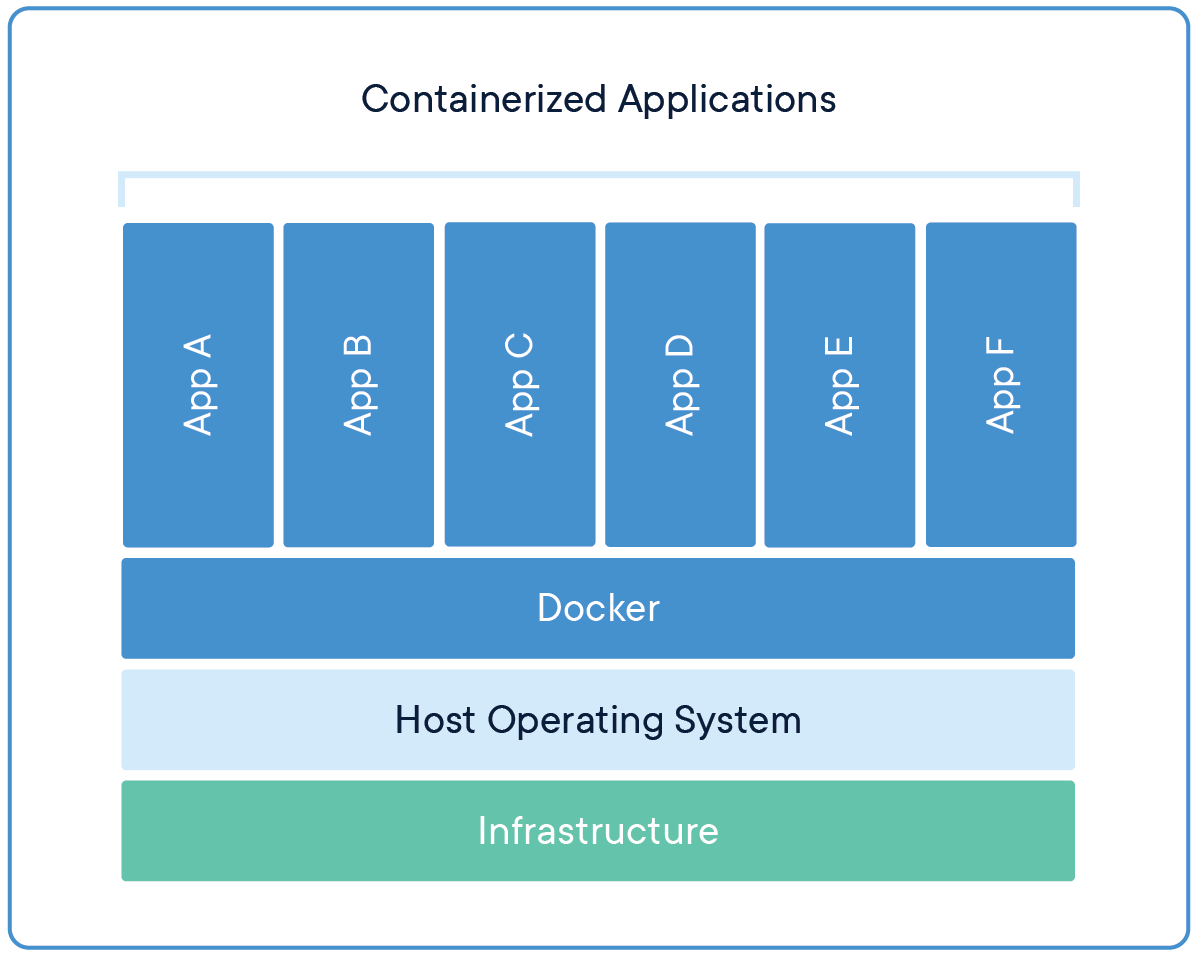
Docker is a containerization app, containerization is a type of virtual machine similar to VMWare.
The difference is that instead of creating an entirely separate virtualized computer docker creates lightweight container containing all the needed software to run an app on top of an existing OS. This means that the container doesn't need to simulate/virtualize an entire operating system, which make it a lot faster and less resource intensive.
What is a container?. Docker. (2023, October 26).
Here's another very good TLDR:
Let's ingest some data
The dataset used in the previous cohort was the ny_taxi trips dataset from January 2019 because it's the last year the ny_taxi dataset was released in .csv format. I am going to be using the January 2022 dataset, which is in .parquet format. This will change the ingestions script and nothing else.
To start ingesting we first need somewhere to ingest it to, so let's start by setting up the postgres database.
We are going to do that by using docker, because it's a lot easier than running it locally.
To do this we will need to use docker-compose, which is an orchestration tool for running one or more docker containers.
Make sure you have docker-desktop installed before proceeding.
Postgres & PgAdmin Setup
The docker-compose.yml file should placed in the root of the repo and it should look like this:
version: '1'
##########################################################################
# If you decide to use this, make sure to remove all the comments first. #
##########################################################################
services:

	pgdatabase:
	# The name of the database, this is used as the host when connecting to the
    # database from other docker containers or the local machine.

		image: postgres:13 # The docker image used to create the database

		environment: # Environmental variables set inside fo the container.

			- POSTGRES_USER=db-user # These

			- POSTGRES_PASSWORD=db-password # Are Not

			- POSTGRES_DB=db-name # Optional

		volumes: # This is were the container connects to the local machine.

			- ./data:/var/lib/postgresql/data
			# this stores the database on the local machine enabling data to
			# persist between runs.

			- ./sql/create_tables.sql:/docker-entrypoint-initdb.d/create_tables.sql
			# This allows the user to run SQL scripts on startup by putting the
			# script in a /sql directory at the root of the repo.

		ports:

			- "5433:5432" # Allows to map the containers 5433 port to the locals 5432 port.

		healthcheck: # Used to determine when the container is up and running.

			test: ["CMD-SHELL", "pg_isready -d db-name -U db-user"]

				interval: 10s

				timeout: 5s

				retries: 5


	pgadmin:
	# This is a GUI for postgres.

		image: dpage/pgadmin4

		environment:
			# Use these to log it to pgAdmin.
			- PGADMIN_DEFAULT_EMAIL=admin@admin.com

			- PGADMIN_DEFAULT_PASSWORD=root

		ports:

			- "8888:80" # Will be available on localhsot:8888

		depends_on:

			pgdatabase:

			condition: service_healthy
			# This container will only start setting up after the database is
			# up and running.
To run this simple navigate to the directory hosting the docker-compose.yml file and run the following command.
docker-compose up
Once everything is up you should be able to visit localhost:8888 and see something like this.

PgAdmin Login Screen
Creating the Schema and Table
In order to create the schema and table we need to run the following SQL on the Database.
CREATE SCHEMA IF NOT EXISTS de_zoom_camp;

CREATE TABLE de_zoom_camp.ny_yellow_taxi (
ID SERIAL PRIMARY KEY,
	vendor_id INT,
	pickup_datetime DATE,
	dropoff_datetime DATE,
	passenger_count INT,
	trip_distance FLOAT,
	pickup_ocation INT,
	dropoff_location INT,
	rate_code INT,
	payment_type INT,
	fare_amount FLOAT,
	tip_amount FLOAT,
	tolls_amount FLOAT,
	total_amount FLOAT
);
Of course we can do this is the PgAdmin manually, but there is a better way. We can add it as a .sql script in the /sql subdirectory and it will run automatically on start.
The Ingestion Script
Now that we have a database we have someplace to put the data, we can start working on the ingestion script.
For a cheatsheet on running scripts with docker, see Running Scripts in Docker
Let's create a script that will be able to download the ny_taxi data, read it, clean it and load it into the database. This process is often referred to as an ETL (Extract, Transform, Load) pipeline.
Here's the script that I came up with.
import os
from time import time
import urllib.request
import pandas as pd
import pyarrow.parquet as pq
from sqlalchemy import create_engine
import psycopg2


#################################################

### SECTION 1: Setup and Download the Dataset. ###

#################################################


# Create the directory if it doesn't exist.
os.makedirs("ny_taxi", exist_ok=True)

# URL of the dataset.
url = "https://d37ci6vzurychx.cloudfront.net/trip-data/yellow_tripdata_2023-01.parquet"

# Download the dataset.
urllib.request.urlretrieve(url, "ny_taxi/yellow_tripdata_2023-01.parquet")

print("Dataset downloaded successfully!")


####################################

### SECTION 2: Load the dataset. ###

####################################


# Read the parquet file.
parquet_file = pq.ParquetFile("ny_taxi/yellow_tripdata_2023-01.parquet")


#################################################

### SECTION 3: Setup the database connection. ###

#################################################


# Connect to database.
conn = psycopg2.connect(

	host="pgdatabase",
	port="5432",
	database="db-name",
	user="db-user",
	password="db-password"

)


# Use existing psycopg2 connection to create engine.
engine = create_engine('postgresql+psycopg2://', creator=lambda: conn)


####################################################

### SECTION 4: Ingest the dataset into postgres. ###

####################################################


# The columns we want to extract from the parquet file.
needed_columns = [

	"VendorID",
	"tpep_pickup_datetime",
	"tpep_dropoff_datetime",
	"passenger_count",
	"trip_distance",
	"RatecodeID",
	"PULocationID",
	"DOLocationID",
	"payment_type",
	"fare_amount",
	"tip_amount",
	"tolls_amount",
	"total_amount"

]


# Start total ingestion time timer.
t_start = time()


# Ingest the data to the database a chunk at a time.

# Otherwise the whole file will be loaded into memory.

# Large files will crash the process.
for batch in parquet_file.iter_batches(batch_size=100000, columns=needed_columns):

	# Start batch timer.
	b_start = time()


	batch_df = batch.to_pandas()


	# Rename columns.
	new_column_names = {

		"VendorID": "vendor_id",
		"tpep_pickup_datetime": "pickup_datetime",
		"tpep_dropoff_datetime": "dropoff_datetime",
		"RatecodeID": "rate_code",
		"PULocationID": "pickup_location",
		"DOLocationID": "dropoff_location",

	}


	batch_df = batch_df.rename(columns=new_column_names)


	# Drop rows with missing values.
	df = batch_df.dropna()


	# Drop rows with invalid values.
	df = df[df['pickup_datetime'].dt.year == 2023]
	df = df[df['dropoff_datetime'].dt.year == 2023]

	df = df[df['pickup_datetime'].dt.month == 1]
	df = df[df['dropoff_datetime'].dt.month == 1]


	with engine.begin() as conn:

	# Ingest the data to the database, replace if they exist.
	df.to_sql(name='ny_yellow_taxi', schema="de_zoom_camp", con=conn, if_exists='append', index=False)

	# End batch timer.
	b_end = time()

	print('inserted another chunk, took %.3f second' % (b_end - b_start))


# End total ingestion time.
t_end = time()

print("Finished ingesting data into the postgres database, it took %.3f seconds" % (t_end - t_start))
To run this script we need automatically we can put it inside of it's own custom docker container and set it up to run right after the database boots up.
If you want to see how to analyze the dataset check out this jupyter notebook by thebadcoder96.
To do that we need to add this to the docker-compose.yml file.
ingestion_script:

	build: .

	volumes:

	- ./ny_taxi:/app/ny_taxi

	depends_on:

	pgdatabase:

	condition: service_healthy
This will build a local dockerfile and run it as a container, it will also create a volume in the repo where we can see the downloaded ny_taxi dataset file.
The dockerfile for the script is just a file named Dockerfile in the same directory as the docker-compose.yml. It doesn't need to be named Dockerfile to be a dockerfile, it can be named Dockerfile_Ingest_Script instead, but then instead of build . the docker-compose service would have to refer to a dockerfile-ingest-script file like this.
ingestion_script:

	build:
		context: .
		dockerfile: Dockerfile-Ingest_Script
The Dockerfile should look something like this:
# Use an official Python runtime as the base image.
FROM python:3.9-slim


# Set the working directory in the container.
WORKDIR /app


# Copy the requirements file into the container.
COPY requirements.txt .


# Install the Python dependencies.
RUN pip install --no-cache-dir -r requirements.txt


# Copy the Python script into the container.
COPY data_ingestion.py .


# Set the command to run the Python script when the container starts.
CMD ["python", "data_ingestion.py"]
One of the cool things about docker images is that you can preinstall software on them so everything is ready to go as soon as the container starts.
In this dockerfile this is accomplished by basing it on a docker images with python already installed and copying and then running a requirements.txt file to install all of our packaged.
The requirements.txt file contains all of the packages needed to run the script, which are:
pandas==2.1.4
psycopg2-binary==2.9.9
pyarrow==14.0.2
SQLAlchemy==2.0.25
Not that everything is set up, let's build the image:
docker-compose build
Once that is done the script is ready to run.
docker-compose up
In the terminal you can see how long it takes to load all of the data. For me it was 118.404 seconds.
Now that the data has been loaded, you can go to the PgAdmin console and check out the dataset.
To check if the dataset loaded correctly you can run a simple select sql script, like this:
SELECT * FROM de_zoom_camp.ny_yellow_taxi;
The results should look like this, there should be 8983146 rows.

The full code
The full code is available here.